Like many modern software teams, we work primarily in Linux, but we have customers who need to run New Relic on Windows. The New Relic Infrastructure agent, for example, runs on Windows Server 2008, 2012, and 2016. However, until recently, our build-and-deploy process for Windows was decidedly manual—in fact, the build-and-deploy environment was literally run from a teammate’s laptop!
This manual process created a significant amount of toil for our team when we were ready to release a new agent version. Previously, we automated the build pipeline for our Linux agents, so I saw no reason why we couldn’t also do this for our Windows agent.
The required steps—and a taste of the unknown
To make this build-and-deploy pipeline meaningful, we had to cover four essential steps:
- Build the agent installer
- Deploy the installer to canary machines
- Run tests on the canaries
- Release the installer
In addition to our normal Jenkins build tool, we also used Ansible, Powershell, and Windows Remote Management (WinRM) to automate the pipeline. We chose Ansible because it has Windows support, and we already use it to provision machines, which meant the team wouldn’t have to learn another technology. Powershell is the native shell for Windows, and WinRM is an obvious choice for remote access.
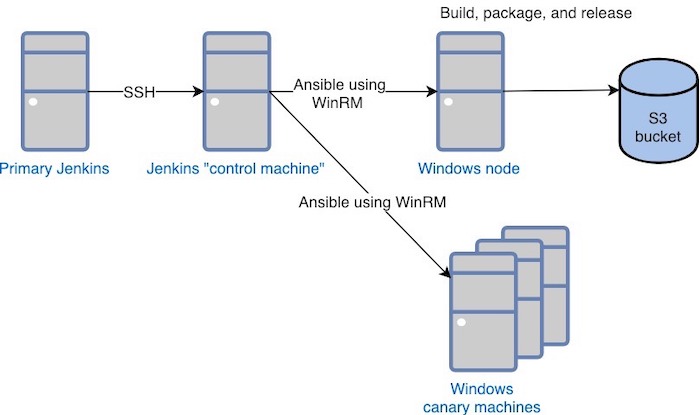
This is the scenario we proposed:
From our primary Jenkins server, we SSH into a Jenkins “control machine,” and run an Ansible playbook that uses WinRM to: 1) deploy the agent to a set of Windows canary machines in our testing environment to ensure our code is free of bugs or other issues; and 2) trigger the build, package, and release artifact on a separate Windows machine, which then deploys the final agent package to our Amazon S3 bucket.
We could have used Powershell scripts to deploy the agent code directly from our primary Jenkins server to our Windows node, but we choose to use Ansible on the control machine because our team already uses it to manage the on-host integrations we build and support. With Ansible, we can run our integration tests for all the operating systems we support; it installs the required tools, runs our tests, and then uninstalls everything.
Once we decided the how, we faced an even bigger challenge: A good portion of the team didn’t have much experience working with Powershell and WinRM—but as you’ll see, we found they were fairly simple to use!
Powershell, WinRM, and other Windows magic
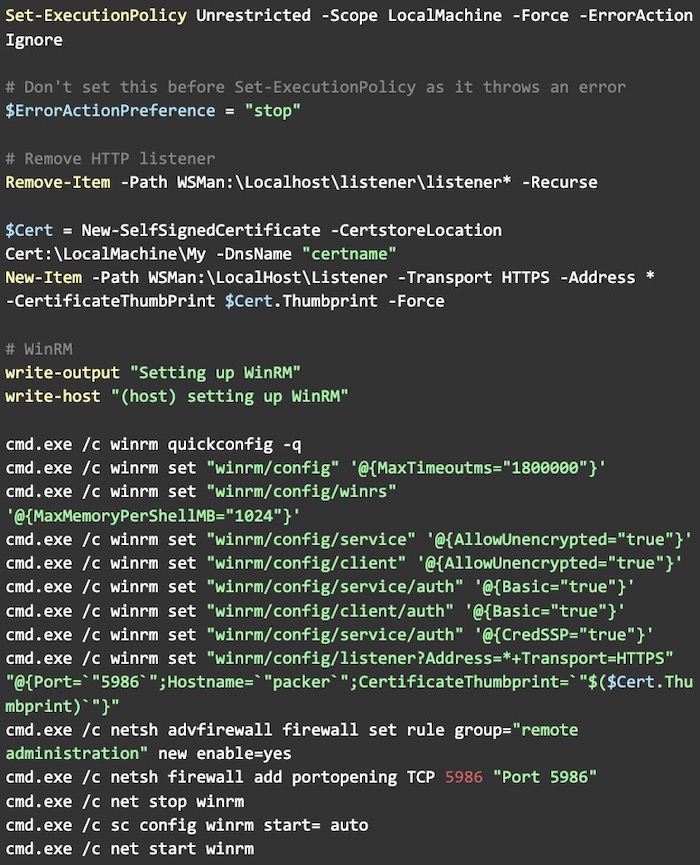
To build the pipeline, first we needed to provision a set of Windows machines with which we could communicate from our Jenkins “control machine.” To build an image for these machines, we used Packer, and then ran Powershell scripts to install the basic libraries and Ansible configurations we needed. We then used the package manager Chocolatey to install the dependencies we needed for our agent builds on the Windows build machine.
The most interesting part of this process, however, was enabling WinRM in the Windows machines. WinRM exposes a port (in this case, 5986), so you can send commands to it. Here’s an example of a shell script to we wrote to enable WinRM on the target machine.
For our Jenkins “control machine,” we had to tell Ansible how to connect to the Windows node where builds happened. To do that, we set up the following variables:
At this point, our pipeline was ready.
Not so hard after all!
Like I said, we had a small learning curve when it came to Powershell and WinRM, but we soon discovered that Powershell is a great, easy-to-use tool that’s even been ported to MacOS and Linux. More importantly, we managed to reduce the release time of our Windows agent from a half-day or longer manual process to a five-minute Jenkins job. That’s a huge reduction in toil!
Las opiniones expresadas en este blog son las del autor y no reflejan necesariamente las opiniones de New Relic. Todas las soluciones ofrecidas por el autor son específicas del entorno y no forman parte de las soluciones comerciales o el soporte ofrecido por New Relic. Únase a nosotros exclusivamente en Explorers Hub ( discus.newrelic.com ) para preguntas y asistencia relacionada con esta publicación de blog. Este blog puede contener enlaces a contenido de sitios de terceros. Al proporcionar dichos enlaces, New Relic no adopta, garantiza, aprueba ni respalda la información, las vistas o los productos disponibles en dichos sitios.


