This is the final installment of four-part series on getting started with open source projects.
Once considered a place for engineers to showcase their projects and dedicated communities, open source has grown to be used, encouraged, and loved by almost every developer. Today, an active portfolio on GitHub or GitLab is an important thing to have when applying for jobs, but also shows how you give back to the developer community.
As a result, many developers are interested in starting successful open source projects. While contributing to existing projects is an alternative route, pushing your own projects out to the world comes with a more rewarding learning curve. Most aspects of an open source project have nothing to do with the source code. Looking at some of the most successful open source repos, you can see that these projects are thriving communities.
In this article, we'll look at five tips for starting an open source project—these ingredients will make your project collaborative, understandable, and inviting.
1. Start with a great README
In GitHub, a README file is a repository's descriptive document. These files are often decorated with informative graphics and banners, as well as links, code snippets, and other useful pieces of information.
The main README in a project's repository is the first thing most developers will see. Looking at other open source projects, you'll quickly find a common structure that you should include:
- Some informative banners (build status, package manager link, license, coverage, and so on)
- Name and project goal
- How to use the project ("getting started")
- Some (simple) examples of using the project
- How to contribute (sometimes with a contributor’s guide)
- Useful links
- The project license (e.g., MIT, Apache)
The informative banners could look like this:
Usually, they should include the most relevant links and status indicators.
Be concise when introducing the project. Give clear instructions on how to get up and running quickly in simple, direct sentences.
When you present a graphical application (e.g., a desktop app), include screenshots in the README showing where to navigate or what the screen should look like when the user navigates to the appropriate place. If you’ve written a console application, some output code snippets will help the user confirm everything is working. Tools like asciinema are crucial for quickly showing what's going on. A link to a demo video hosted on YouTube, or your preferred video platform, will also help guide users through the setup process. After all, your README should be inclusive of many learning styles.
Whether your project is a library, an application, or just a set of data, include instructions for using or installing it on all relevant platforms. If a certain operating system isn’t supported, mention this explicitly. Quite often, a matrix with supported frameworks, standards, or systems is helpful. This is also a chance for winning over new contributors by communicating your vision.
2. Don't skip documentation
Your README should contain simple examples and offer links to further documentation. Great documentation may sound like an additional, optional, project component. However, documentation is the factor that will distinguish your project from others.
If you look at some of the most popular open source projects, you'll find that they have detailed documentation. It doesn't matter how great your code is if nobody can figure out how to use it. Ideally, you should include example projects using your code to show project use cases.
Think of it this way: If you knew nothing about this project, what information would you need to get started? What would you need to know to understand the project's use case in full depth? If the documentation can answer these questions, it forms a solid basis for the project’s community.
3. Track issues publicly
Building software is a continuous process, and tracking issues publicly allows potential contributors to see your to-do list. Some of these issues are cosmetic, while others are bugs that impact performance. Some issues can be resolved in seconds, and others are more difficult to tackle. Sometimes workarounds exist; sometimes a hotfix is needed.
However, without a public issue tracker, no one has visibility. No one can contribute or provide workarounds. Is the issue affecting many users? Can somebody help in providing a hotfix? No one expects issue-free software, but people do expect openness and transparency in the community.
Ultimately, the mere presence of public issues can help you grow a project. This shows that you’re actively maintaining your project and looking for contributors. Another reason is that people need to have a platform for similar issues or active work items to contribute.
4. Add a contributor guide
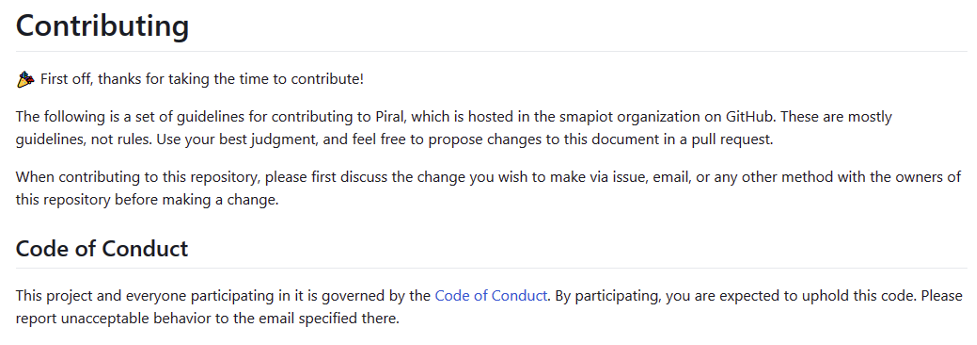
To encourage new contributors to submit a pull request (PR), it's helpful to add a contributor guide to your project. A guide gives interested contributors a place to learn what they need to do to contribute to the project. For example:
The contributor guide should include a style guide, coding standards, testing requirements, and instructions on submitting pull requests.
Include a code of conduct to give the project a proper frame. Leave no place for anti-community things like racism or offensive speech. Encourage a friendly, professional discussion, where newcomers are embraced and patiently guided.
5. Have a list of good first issues
GitHub's good first issue list shows a useful feature of issues: tags. It's helpful to tag easier bugs or feature requests as good beginner issues. These are small in scope and easy enough for a new developer to the project to solve.
These "first issue" items provide an on-ramp for interested developers to become new contributors to projects. Once they have solved one or two easy issues, they'll be ready to take on more complex tasks.
For all issues, clearly describe why these issues exist. For new features, add a bit of background information for general motivation and potential steps for adding the feature. For bugs, describe how the bug can be reproduced and what the expected behavior is. If side effects of solving the bug are known already, include them, too.
Besides issue classification, you should also use tags to indicate the functional area, the severity (for bugs), and the current state. For example, is the item already grabbed or still up for grabs? Or is a solution already available in a preview version?
You can also leverage milestones to fully inform users about when a bug fix or a feature is expected.
Next steps
When starting an open source project, you aren't just posting projects online; you are creating a community.
Community building rarely happens by accident. It usually requires a concerted effort. While not every project is a community magnet, the basics to provide everything for growing a community are helpful in many ways.
Having all the necessary bells and whistles in place is certainly great, but no one will use the project if it is not known. When you are done with the basics, it's time to tell the community about your project. Start with friends or use your coworkers to find first collaborators and get a critical (but usually still positive) view on it. Use the momentum to post about the project on community sites, newsletters, forums, and other relevant places.
For more information on our open source projects, check out New Relic Open Source. And feel free to file an issue or submit a pull request while you’re there, too. We’re always looking for contributors.
이 블로그에 표현된 견해는 저자의 견해이며 반드시 New Relic의 견해를 반영하는 것은 아닙니다. 저자가 제공하는 모든 솔루션은 환경에 따라 다르며 New Relic에서 제공하는 상용 솔루션이나 지원의 일부가 아닙니다. 이 블로그 게시물과 관련된 질문 및 지원이 필요한 경우 Explorers Hub(discuss.newrelic.com)에서만 참여하십시오. 이 블로그에는 타사 사이트의 콘텐츠에 대한 링크가 포함될 수 있습니다. 이러한 링크를 제공함으로써 New Relic은 해당 사이트에서 사용할 수 있는 정보, 보기 또는 제품을 채택, 보증, 승인 또는 보증하지 않습니다.


