Adding observability in today's modern infrastructure at enterprise scale isn't just about installing and configuring agents. It's about keeping instrumentation healthy, consistent, and up to date across dozens—or even hundreds—of environments. For many teams, this process still results in manual toil, fragmented tooling, and observability blind spots into what's actually running.
With Fleet Control and Agent Control, we're introducing a better way to manage instrumentation at scale. As we announced at New Relic Now+, these two new capabilities are available as part of New Relic Control, giving teams a centralized, scalable, and simplified way to manage infrastructure-level instrumentation on Kubernetes clusters.
Introducing Fleet Control and Agent Control
Observability only works if the instrumentation behind it is healthy, complete, and up to date. This is where Fleet & Agent Control come in, by providing centralized and remote command over fleets of managed Kubernetes clusters for full instrumentation lifecycle management at scale. Key unique benefits include:
- Centralized agent operations and reduce manual toil: Install, monitor, configure, and update Kubernetes infrastructure instrumentation in one place.
- Custom fleets for bulk management: Group agents by instrumentation needs and easily upgrade agent versions for entire fleets with a few clicks—no scripts needed.
- No telemetry blindspots: Manage agents on Kubernetes clusters with one lightweight supervisor—Agent Control—that keeps them in sync with your desired state.
Whether you're spending hours updating all of your agents to the most recent version or spending cycles trying to find which of your agents are unhealthy, Fleet and Agent Control will help streamline your instrumentation process with a few simple steps.
In this blog post, you'll learn:
- What permissions you need to start using Fleet Control and Agent Control.
- How to create, manage, and configure fleets with Fleet Control.
- How to set up Agent Control to enable fleet management.
Note: This public preview supports infrastructure instrumentation for Kubernetes clusters only, including Infrastructure, New Relic OpenTelemetry Collector (NRDOT), Prometheus, and Fluent Bit agents.
Get started with Fleet & Agent Control
First, be sure you opt-in to the Fleet Control public preview. Simply navigate to All Capabilities → New Relic Control. You will see an "Opt In" page and can join if you aren't already participating in the public preview.
Permissions
You will need the following permissions to use Agent Control and Fleet Control:
- Authentication Domain Manager: This role provides permissions related to adding and managing users, including configuring authentication domains and customizing groups and roles, which are required when installing Agent Control to a Kubernetes cluster.
- Organization Manager: This role provides permissions related to organization settings, which are required to create and edit fleets in Fleet Control.
Understanding fleets
Now that you have the required access, you're ready to start managing fleets with Fleet Control and Agent Control.
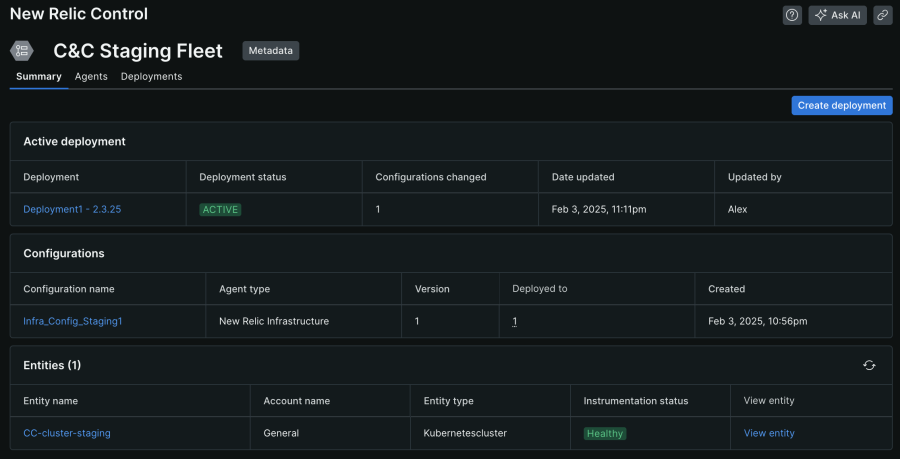
Here's an example of a fleet, which is made up of three main components:
- Active deployment: The most recent deployment summary
- Configurations: The configurations that are being applied to the instrumentation running on your clusters
- Entities: All the managed Kubernetes clusters joined to this fleet

Here are some key points to understand about fleets:
- Create a deployment to make instrumentation changes to a fleet.
- Any configurations added to a fleet will apply to all managed clusters joined to that fleet.
- Only clusters that have Agent Control installed on them can be added to a fleet.
Step 1: Creating a Configuration
Agent configurations shape how data is sent to New Relic, so this is the first step to setting up your fleet. Follow these steps to set up your first configuration:
- Navigate to New Relic Control → Configurations.
- Click Create configuration and select New.
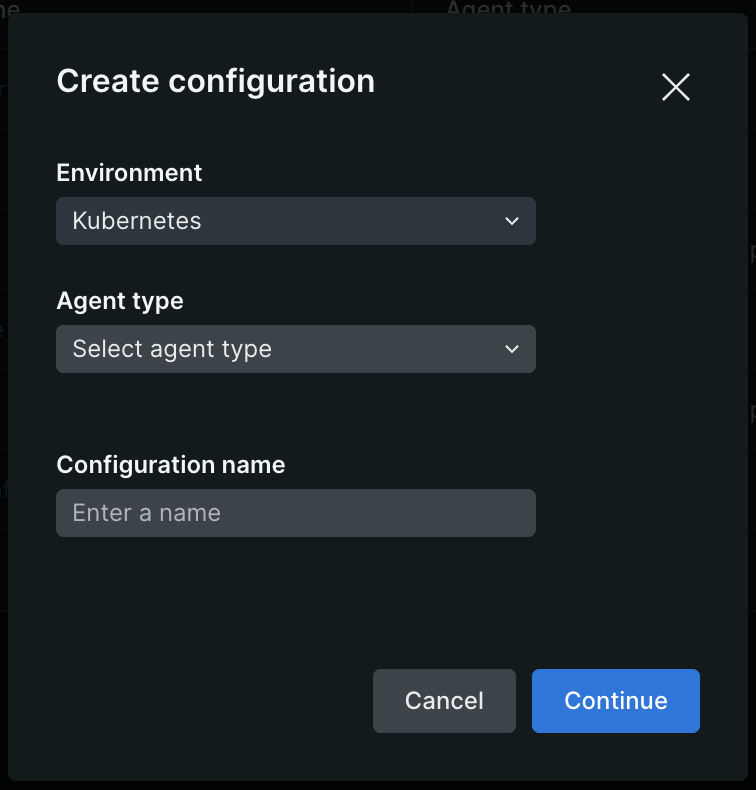
- Select Kubernetes as the Environment, the Agent type you’d like for your configuration, and add a name.
- Enter your configuration manually or copy and paste the Default Template provided for that given agent type.
With your agent configurations set up, you're ready to add them to a fleet!

Step 2: Creating a Fleet
Fleets are a powerful way to group managed entities, such as Kubernetes clusters, so you can configure them as one. Instead of managing each agent individually, you can deploy configurations at the fleet level and then every member of the fleet receives them automatically. Here's how to create a fleet, add your configuration, and deploy it:
- Navigate to New Relic Control → Fleets.
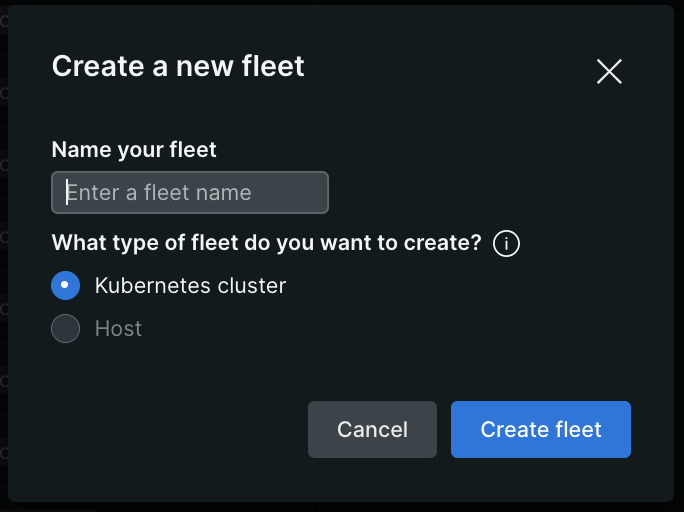
- Click Create a fleet and give it a name.
- Click Create fleet.
- Next, with your newly created fleet, click Create a deployment.
- Name the deployment, click Add configuration, then add the configuration you just created.
- Lastly, click Save draft followed by Start deployment.
You now have your new configuration linked to your fleet, ready for clusters to be added. The only thing left to do is set up Agent Control on your clusters and add them to the fleet!

Step 3: Agent Control: Supervise your agents remotely
Agent Control is a lightweight supervisory agent used to remotely manage infrastructure instrumentation on Kubernetes clusters. It receives remote commands from Fleet Control to keep agents and configurations up to date and consistent, while continuously monitoring agent health in real time. To get started:
- Find Agent Control by navigating to Integrations & Agents → Agent Control.
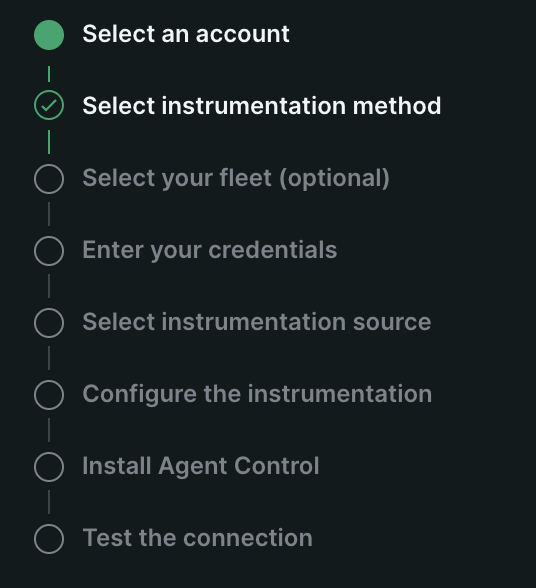
- Select Kubernetes as your "Instrumentation method" and select the fleet you created earlier.
- Complete the remaining steps in the guided install (shown in the image below).
To see an in depth walkthrough of Agent Control, see our documentation here.

Note: If you already have an instrumented Kubernetes cluster, you'll need to first uninstall the instrumentation, then add Agent Control and reinstall your instrumentation. Learn more here.

After the pods of your newly installed Agent Control are running successfully, the cluster will become a member of the fleet you selected. It may take several minutes for the cluster to show up in the Entities list.
And that's it! Once your cluster that’s running Agent Control joins the fleet, all of the agents running on the cluster will be using the configurations you've deployed to the fleet.
At this point, you’ll be able to easily do the following:
- Upgrade all agents in a fleet: All you need to do is create a new version of your configuration, create a deployment, select the newer version of the configuration, and start the deployment. You no longer have to write scripts to update hundreds or thousands of agents in bulk. Fleet Control simplifies this task with an intuitive and scalable UI process.
- Check your agent health: Using Fleet Control makes checking the health of agents running on your clusters easier than ever. Fleet Control gives you access at your fingertips to check all of your instrumentation at a glance.

Summary
Agent Control's efficient supervisory agent and Fleet Control's easy-to-use interface simplify managing your instrumentation at scale. You can easily view the health of your fleets, see all your agents at a glance, and update them automatically with a single deployment. Stay tuned for more as we expand these capabilities and make Fleet and Agent Control generally available.
Next steps
- Take a deep dive into New Relic Control docs.
- Learn about the third capability of New Relic Control: Pipeline Control.
- If you’re not already using New Relic, get started with New Relic for free. Your free account includes 100 GB/month of free data ingest, one free full-access user, and unlimited free basic users.
The views expressed on this blog are those of the author and do not necessarily reflect the views of New Relic. Any solutions offered by the author are environment-specific and not part of the commercial solutions or support offered by New Relic. Please join us exclusively at the Explorers Hub (discuss.newrelic.com) for questions and support related to this blog post. This blog may contain links to content on third-party sites. By providing such links, New Relic does not adopt, guarantee, approve or endorse the information, views or products available on such sites.


